What is a Secondary Water Barrier and Why It Matters in Tampa
Living in Tampa means facing hurricane-force winds and heavy rainfall every storm season. When shingles blow off during a storm, the underlayment becomes your roof’s last defense against water intrusion. A secondary water barrier provides that extra layer of protection when the primary roof covering fails. This specialized underlayment system can significantly reduce your homeowners insurance premiums through wind mitigation credits. Navigating Roof Insurance Claims After a Storm in Tampa.
The secondary water barrier works by creating a self-adhering, waterproof seal across your entire roof deck. Unlike standard felt paper that can tear or blow away, these polymer-modified bitumen sheets bond directly to the plywood, forming a continuous moisture barrier. When properly installed according to Florida Building Code requirements, this system can qualify you for substantial insurance discounts while providing peace of mind during Florida’s most severe weather events. Florida Building Code Section 1504.1.6.
Homeowners in coastal communities like South Tampa and Seminole Heights are discovering that this upgrade pays for itself through insurance savings within just a few years. The investment becomes even more valuable when you consider the potential water damage costs from a compromised roof during a major storm.
How the Secondary Water Barrier Lowers Your Insurance Premiums
Insurance companies in Florida offer wind mitigation discounts because homes with enhanced roof protection present lower risk during hurricanes. The secondary water barrier qualifies as one of the key components on the Florida Office of Insurance Regulation’s Wind Mitigation Inspection Form OIR-B1-1802. This form documents your home’s storm-resistant features and directly translates to premium reductions. Florida Office of Insurance Regulation.
The discount structure varies by insurance carrier, but homeowners typically see 10-25% savings on their windstorm portion of the premium. For a typical Tampa home with annual premiums around $3,000, this translates to $300-750 in yearly savings. The barrier must meet specific Florida Building Code requirements, including ASTM D1970 standards for self-adhering polymer modified bitumen sheets.. Read more about Why Your Florida Homeowners Insurance Might Get Canceled Because of an Old Roof.
During a wind mitigation inspection, the certified inspector examines several critical areas. They verify the barrier extends across all roof eave and gable end perimeters, typically covering the first two feet from all edges. The inspector also checks for proper overlap seams and confirms the material is correctly fastened according to manufacturer specifications. Homes in flood-prone areas of Riverview benefit doubly from this protection.
The inspection process itself is straightforward and usually takes 30-45 minutes. The inspector documents findings on the OIR-B1-1802 form, which your insurance company uses to calculate credits. Many Tampa homeowners schedule these inspections proactively before renewal periods to maximize their savings potential.
Understanding Wind Mitigation Inspection Requirements
The wind mitigation inspection is a standardized assessment required by Florida law for insurance premium discounts. Licensed inspectors use the OIR-B1-1802 form to evaluate seven key areas of your home’s wind resistance. The secondary water barrier falls under the Secondary Water Resistance (SWR) category, which is one of the highest-value credits available.
During the inspection, the technician examines your roof from both inside the attic and outside. They look for specific installation patterns, material types, and fastening methods. For secondary water barriers, they verify the material meets ASTM D1970 standards and check the installation extends the required distance from roof edges. The inspector also documents the roof’s age, deck attachment method, and overall condition.
Many homeowners in Westchase schedule these inspections during their annual maintenance visits. The inspection costs typically range from $75-150 and can be completed in under an hour. The resulting form remains valid for five years, though major roof work or storm damage may require updates.
The wind mitigation form creates a clear paper trail for insurance companies. It proves your home meets specific building code requirements and includes enhanced protection features. This documentation becomes especially valuable when filing claims or negotiating with insurance providers about premium rates.
Comparing Secondary Water Barrier System Options
| Barrier Type | Material Cost per Square | Installation Complexity | Insurance Credit Value | Best For |
|---|---|---|---|---|
| Self-Adhering Polymer Modified Bitumen | $35-45 | Moderate | High (10-25%) | Hurricane Zones |
| Synthetic Underlayment | $12-18 | Easy | Low (5-10%) | Moderate Wind Areas |
| Taped Seams System | $20-30 | High | Medium (15-20%) | Custom Homes |
The self-adhering polymer modified bitumen system represents the gold standard for secondary water barriers in Florida. This material consists of asphalt modified with rubber or plastic polymers, creating exceptional flexibility and adhesion. The sheets come with a release film that peels away during installation, allowing the material to bond directly to clean, dry roof decking.
Synthetic underlayment offers a lighter-weight alternative but typically provides lower insurance credits. These materials, usually made from polypropylene or polyethylene, install more quickly but don’t achieve the same level of adhesion as self-adhering systems. They work best in areas with moderate wind exposure rather than direct hurricane zones.
Taped seam systems use standard underlayment with reinforced seams sealed using specialized tape. While more labor-intensive to install correctly, these systems can achieve good water resistance when properly executed. However, they rarely qualify for the highest insurance credits since the seams remain potential failure points.
The choice often depends on your specific location within Tampa. Homes in coastal evacuation zones benefit most from the highest-rated systems, while properties further inland might find adequate protection with mid-range options. Your roofing contractor can assess your property’s specific wind exposure and recommend the most cost-effective solution. Roofing Dunedin.
Florida Building Code Requirements for Tampa Homes
The Florida Building Code establishes specific requirements for secondary water barriers in High Velocity Hurricane Zones. Section 1504.1.6 of the Residential Code mandates these systems for new construction and major roof replacements in designated areas. Tampa falls within these requirements due to its coastal location and hurricane exposure risk. New Roof Construction.
For homes in Hillsborough County, the code requires secondary water barriers to extend across the entire roof deck or at minimum across the bottom portion of all roof slopes. The material must meet ASTM D1970 standards for asphalt-saturated organic felt or ASTM D226 for inorganic reinforced felt. Many contractors now exceed these minimums by installing full-deck coverage systems.
The installation process follows strict guidelines outlined in the code. Barriers must overlap by at least 6 inches horizontally and 3 inches vertically. Fasteners require specific spacing patterns, typically 6 inches along seams and 12 inches in the field. The code also addresses proper surface preparation, requiring clean, dry decking free from dust and debris.
Local building departments in Tampa enforce these requirements through permit inspections. Contractors must submit detailed installation plans and schedule inspections at key phases. The final inspection verifies compliance before the roofing system receives approval. Non-compliant installations can result in failed inspections, delaying project completion and potentially affecting insurance coverage. Roofing Saint Petersburg.
Recent code updates have strengthened requirements based on post-hurricane performance data. The 2020 Florida Building Code introduced enhanced testing protocols and more stringent installation standards. These changes reflect lessons learned from storm damage assessments and aim to improve overall roof system performance during extreme weather events.. Read more about How to Spot Hidden Hail Damage on Your Citrus Park Roof Before It’s Too Late.
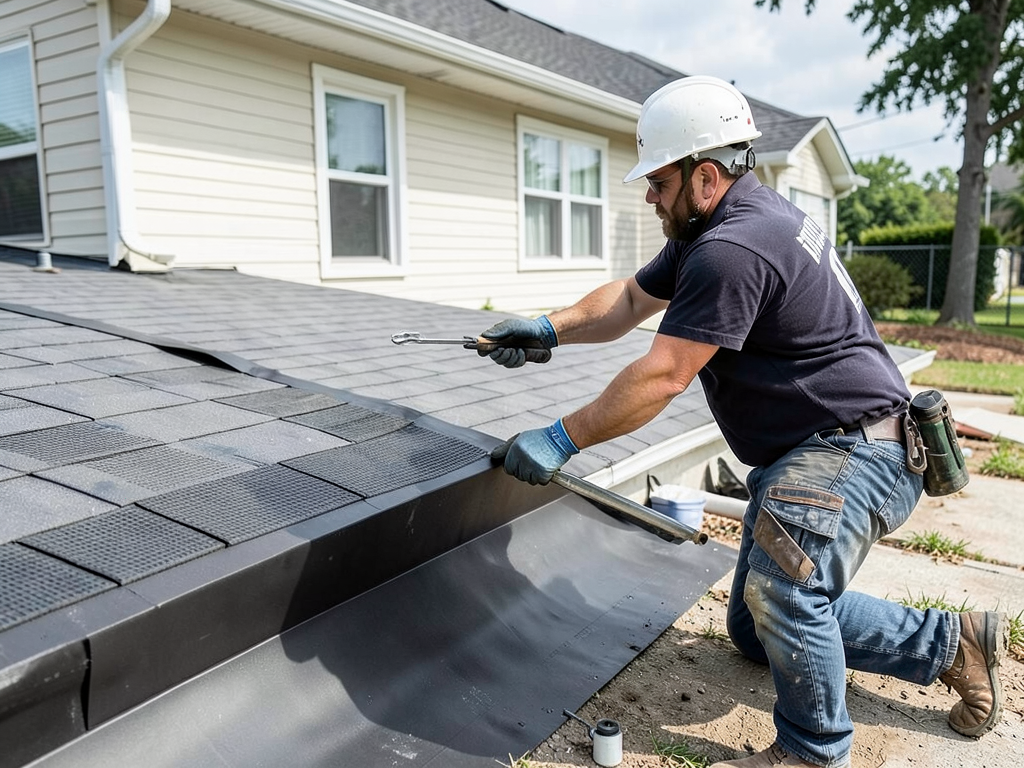
Step-by-Step Installation Process for Maximum Protection
- Surface Preparation
The roof deck must be completely clean and dry. Technicians use compressed air to remove dust, wood chips, and construction debris. Any protruding nails get hammered flush, and damaged decking gets replaced before barrier installation begins.
- Starter Course Application
Installation starts at the lowest edge, typically the eave. The first course overlaps the fascia by at least 1/2 inch. Workers carefully align the material, ensuring straight edges and proper overlap patterns. The self-adhesive backing peels away as the material unrolls.
- Horizontal Course Installation
Each subsequent course overlaps the previous one by the manufacturer’s specified amount, usually 6 inches. Installers work upward across the roof slope, maintaining consistent alignment. They pay special attention to valleys and roof penetrations, ensuring complete coverage at these vulnerable points.
- Seaming and Detailing
End laps receive careful attention, with installers ensuring proper overlap and adhesion. Around roof penetrations like vents and chimneys, technicians cut and fit the material to create watertight seals. They use additional adhesive at these critical junctions for enhanced protection.
The installation process requires specific weather conditions for optimal results. Temperatures must stay above 40°F for proper adhesive activation. High humidity or rain can prevent the material from bonding correctly. Most Tampa contractors schedule these installations during dry periods to ensure quality results.
Professional installation typically takes one to two days for an average home, depending on roof complexity and weather conditions. The process generates minimal mess since the material comes in rolls and requires no special tools beyond standard roofing equipment. However, the adhesive backing makes repositioning difficult once contact is made, so experienced installers work methodically.
After installation, the barrier must pass a final inspection before shingle installation begins. The inspector checks for proper overlaps, complete coverage, and secure adhesion. Any deficiencies get corrected immediately to ensure the system will perform as intended during severe weather.. Read more about What to Do When a Roofer Knocks on Your Door After a Storm in Brandon.
Cost Analysis and Return on Investment
Installing a secondary water barrier represents a significant upfront investment, but the long-term benefits often justify the cost. Material expenses for a typical 2,000-square-foot roof range from $1,200 to $2,500, depending on the specific system chosen. Professional installation adds another $800 to $1,500 to the total project cost.
When evaluating the return on investment, consider both direct and indirect benefits. Direct savings come through reduced insurance premiums, typically $300-750 annually for a standard policy. The system also qualifies for annual wind mitigation credits, which compound over time. Most homeowners recoup their initial investment within 3-5 years through insurance savings alone.
Indirect benefits include enhanced property value and reduced risk of water damage. A home with documented storm-resistant features often appraises higher than comparable properties without these upgrades. Additionally, the barrier provides protection against costly repairs from water intrusion, which can easily exceed $5,000 for a single incident.
Many Tampa homeowners find financing options through their roofing contractors or local banks. Some utility companies and government programs offer low-interest loans for storm mitigation improvements. These financing options can make the upgrade more accessible while still providing positive cash flow through insurance savings.
The decision becomes even more compelling for homes in high-risk areas or those approaching replacement age. Adding the barrier during a scheduled roof replacement minimizes labor costs since the deck is already exposed. This timing strategy can reduce the incremental cost to as little as $800-1,200 for the upgrade.
Maintenance and Inspection Guidelines
Once installed, secondary water barriers require minimal maintenance but benefit from periodic inspections. Annual checks should focus on the barrier’s edges and penetrations where separation might occur. Look for lifted edges, tears, or areas where the adhesive bond may have weakened due to age or weather exposure.
After major storms, conduct more thorough inspections even if no visible damage appears on the roof surface. High winds can create stress points that aren’t immediately apparent. Check attic spaces for any signs of moisture that might indicate barrier failure. Early detection of issues prevents more extensive damage and maintains insurance credit eligibility.
Most barriers maintain their effectiveness for 15-20 years under normal conditions. However, Tampa’s intense UV exposure and frequent storm activity can accelerate aging. Some homeowners choose to replace the barrier when re-roofing, even if the existing system appears functional. This proactive approach ensures continuous protection and maintains documentation for insurance purposes.
Professional inspections every 3-5 years provide additional peace of mind. Certified inspectors can assess the barrier’s condition using moisture meters and thermal imaging. They also verify that all penetrations remain properly sealed and that no new issues have developed since installation.
Documentation plays a crucial role in maintaining insurance credits. Keep records of all inspections, maintenance work, and any repairs. Many insurance companies require proof of ongoing maintenance to continue offering wind mitigation discounts. This documentation also proves valuable if you decide to sell your home, as it demonstrates proactive storm protection measures.
Frequently Asked Questions
Does every Tampa home need a secondary water barrier?
Not every home requires one by code, but most benefit from the added protection and insurance savings. Homes built before 2002 may not have these systems, though adding one during roof replacement is highly recommended for insurance credits and storm protection.
How long does installation take and will it disrupt my household?
Installation typically requires 1-2 days and involves minimal household disruption. The work occurs on the roof, though some noise from installation tools is unavoidable. Most families continue normal activities during the process.
Can I install a secondary water barrier myself to save money?
DIY installation is not recommended because improper installation can void insurance credits and compromise protection. The material requires specific temperature conditions and precise application techniques. Professional installation ensures code compliance and insurance qualification.
What happens if I sell my home with a secondary water barrier?
The barrier adds value to your home and provides documentation of storm-resistant features. Many buyers in Tampa specifically look for these upgrades. Keep all installation and inspection records to demonstrate the system’s presence and maintenance history to potential buyers.
Will a secondary water barrier make my roof last longer?
While the barrier primarily protects against water intrusion, it can extend roof life by preventing moisture damage to the deck. However, the shingles or other surface materials still determine the overall roof lifespan. The barrier provides backup protection rather than primary longevity benefits.
How do I know if my current roof has a secondary water barrier?
A qualified roofing contractor can inspect your attic to check for existing barrier systems. Look for self-adhering sheets along the roof edges or full-deck coverage. If your home was built before 2002, it likely doesn’t have one unless added during a later renovation.
Can I add a secondary water barrier to my existing roof?
Adding one to an existing roof requires partial removal of surface materials, making it most practical during a full replacement. However, some systems can be retrofitted in specific circumstances. A professional assessment can determine the best approach for your situation.
Take Action to Protect Your Home and Save on Insurance
The combination of enhanced storm protection and significant insurance savings makes the secondary water barrier one of the smartest investments for Tampa homeowners. With hurricane season approaching and insurance rates continuing to rise, now is the perfect time to evaluate your roof’s current protection level.
Don’t wait until the next storm threatens to discover your roof isn’t adequately protected. A professional assessment can determine whether your home qualifies for wind mitigation credits and identify the best barrier system for your specific needs. The process is straightforward, the investment is reasonable, and the peace of mind is invaluable.
Ready to lower your insurance premiums and strengthen your home’s storm protection? Call (656) 245-0955 today to schedule your free secondary water barrier assessment. Our experienced team serves homeowners throughout Tampa, including Riverview, Westchase, and all surrounding communities. We’ll evaluate your current roof, explain your options, and help you take advantage of available insurance credits.
Don’t let another storm season pass without maximizing your home’s protection. Pick up the phone and call (656) 245-0955 before the next weather alert. Your family’s safety and your financial security are worth this simple call.
{
“@context”: “https://schema.org”,
“@type”: “BlogPosting”,
“headline”: “Understanding the Secondary Water Barrier and How It Lowers Your Tampa Insurance Rates”,
“description”: “Learn how a secondary water barrier protects your Tampa home and qualifies you for wind mitigation discounts on your homeowners insurance. Get expert installation from local pros.”,
“wordCount”: 2520,
“datePublished”: “2026-03-10T12:46:00.000Z”,
“dateModified”: “2026-03-10T12:46:00.000Z”,
“inLanguage”: “en-US”,
“mainEntityOfPage”: {
“@type”: “WebPage”,
“@id”: “https://crestlineroofingtampa.com”
},
“publisher”: {
“@type”: “LocalBusiness”,
“name”: “Crestline Roofing Tampa”,
“url”: “https://crestlineroofingtampa.com”
},
“author”: {
“@type”: “Organization”,
“name”: “Crestline Roofing Tampa”,
“url”: “https://crestlineroofingtampa.com”
},
“image”: {
“@type”: “ImageObject”,
“url”: “https://crestlineroofingtampa.com/wp-content/uploads/2026/03/understanding-the-secondary-water-barrier-and-how-1.png”
}
}
{
“@context”: “https://schema.org”,
“@type”: “RoofingContractor”,
“name”: “Crestline Roofing Tampa”,
“url”: “https://crestlineroofingtampa.com”,
“address”: {
“@type”: “PostalAddress”,
“addressLocality”: “Tampa”
},
“areaServed”: {
“@type”: “City”,
“name”: “Tampa”
}
}
{
“@context”: “https://schema.org”,
“@type”: “FAQPage”,
“mainEntity”: [
{
“@type”: “Question”,
“name”: “Does every Tampa home need a secondary water barrier?”,
“acceptedAnswer”: {
“@type”: “Answer”,
“text”: “Not every home requires one by code, but most benefit from the added protection and insurance savings. Homes built before 2002 may not have these systems, though adding one during roof replacement is highly recommended for insurance credits and storm protection.”
}
},
{
“@type”: “Question”,
“name”: “How long does installation take and will it disrupt my household?”,
“acceptedAnswer”: {
“@type”: “Answer”,
“text”: “Installation typically requires 1-2 days and involves minimal household disruption. The work occurs on the roof, though some noise from installation tools is unavoidable. Most families continue normal activities during the process.”
}
},
{
“@type”: “Question”,
“name”: “Can I install a secondary water barrier myself to save money?”,
“acceptedAnswer”: {
“@type”: “Answer”,
“text”: “DIY installation is not recommended because improper installation can void insurance credits and compromise protection. The material requires specific temperature conditions and precise application techniques. Professional installation ensures code compliance and insurance qualification.”
}
},
{
“@type”: “Question”,
“name”: “What happens if I sell my home with a secondary water barrier?”,
“acceptedAnswer”: {
“@type”: “Answer”,
“text”: “The barrier adds value to your home and provides documentation of storm-resistant features. Many buyers in Tampa specifically look for these upgrades. Keep all installation and inspection records to demonstrate the system’s presence and maintenance history to potential buyers.”
}
},
{
“@type”: “Question”,
“name”: “Will a secondary water barrier make my roof last longer?”,
“acceptedAnswer”: {
“@type”: “Answer”,
“text”: “While the barrier primarily protects against water intrusion, it can extend roof life by preventing moisture damage to the deck. However, the shingles or other surface materials still determine the overall roof lifespan. The barrier provides backup protection rather than primary longevity benefits.”
}
}
]
}
{
“@context”: “https://schema.org”,
“@type”: “HowTo”,
“name”: “Installing a Secondary Water Barrier”,
“step”: [
{
“@type”: “HowToStep”,
“position”: 1,
“name”: “Surface Preparation”,
“text”: “The roof deck must be completely clean and dry. Technicians use compressed air to remove dust, wood chips, and construction debris. Any protruding nails get hammered flush, and damaged decking gets replaced before barrier installation begins.”
},
{
“@type”: “HowToStep”,
“position”: 2,
“name”: “Starter Course Application”,
“text”: “Installation starts at the lowest edge, typically the eave. The first course overlaps the fascia by at least 1/2 inch. Workers carefully align the material, ensuring straight edges and proper overlap patterns. The self-adhesive backing peels away as the material unrolls.”
},
{
“@type”: “HowToStep”,
“position”: 3,
“name”: “Horizontal Course Installation”,
“text”: “Each subsequent course overlaps the previous one by the manufacturer’s specified amount, usually 6 inches. Installers work upward across the roof slope, maintaining consistent alignment. They pay special attention to valleys and roof penetrations, ensuring complete coverage at these vulnerable points.”
},
{
“@type”: “HowToStep”,
“position”: 4,
“name”: “Seaming and Detailing”,
“text”: “End laps receive careful attention, with installers ensuring proper overlap and adhesion. Around roof penetrations like vents and chimneys, technicians cut and fit the material to create watertight seals. They use additional adhesive at these critical junctions for enhanced protection.”
}
],
“image”: “https://crestlineroofingtampa.com/wp-content/uploads/2026/03/understanding-the-secondary-water-barrier-and-how-1.png”
}
{
“@context”: “https://schema.org”,
“@type”: “BreadcrumbList”,
“itemListElement”: [
{
“@type”: “ListItem”,
“position”: 1,
“name”: “Home”,
“item”: “https://crestlineroofingtampa.com”
},
{
“@type”: “ListItem”,
“position”: 2,
“name”: “Blog”,
“item”: “https://crestlineroofingtampa.com/blog”
},
{
“@type”: “ListItem”,
“position”: 3,
“name”: “Understanding the Secondary Water Barrier and How It Lowers Your Tampa Insurance Rates”
}
]
}
{
“@context”: “https://schema.org”,
“@type”: “Service”,
“serviceType”: “Roofing”,
“provider”: {
“@type”: “LocalBusiness”,
“name”: “Crestline Roofing Tampa”,
“url”: “https://crestlineroofingtampa.com”
},
“areaServed”: {
“@type”: “City”,
“name”: “Tampa”
},
“description”: “Learn how a secondary water barrier protects your Tampa home and qualifies you for wind mitigation discounts on your homeowners insurance. Get expert installation from local pros.”
}